
Canon cameras have long been known to have good quality AF if not quite perfect AF. Canon’s top end DSLR’s allowed professional’s to get many excellent photos of athletes running around doing things. But that performance was generally reserved for the top of the line 1D series. Most people who are even interested in buying a $6,500 1D series camera are going to have an idea of how to use it. That’s pretty much a given.
Now however, Canon has released the RF mirrorless line of cameras which all have more advanced AF systems. Camera’s like the R5 and the R6 mk II have amazing AF capability, and an amazing amount of options that many people who owned 5D’s and 6D’s may not be used to seeing.
For instance, the Canon R5 has a whole bunch of settings that are entirely new for Canon camera’s. Things like “eye detection” are totally new now as is the ability to select the subject type that the camera will look for.
While all those settings seem like they should be self explanatory I am saying that as someone who has used the R5 for nearly 3 years now. So, I’ll try to explain these settings in detail no matter how obvious it seems.
Getting Started
The first thing to do if you are focusing on live subjects like people or animals is to set the camera to SERVO AF mode. You can find this on Page 1 of the R5’s AF camera menu.
The setting is called “AF operation”. Simply select it and toggle it over to “SERVO AF”.
If you are taking pictures on a tripod of landscapes and such things, the most accurate focus mode is going to be “ONE SHOT AF”.
In the past with DSLR’s it would have been important to chose “ONE SHOT AF” for landscapes didn’t unnecessarily hunt for focus, but with the R5 I have found that it’s very nearly as accurate in either mode.
However, with some lenses, especially some of the cheaper RF STM lenses, “ONE SHOT AF” is absolutely still the best option. As a general rule the best approach is to choose “ONE SHOT” if you’re photographing landscapes or you want the absolute best possible focus.
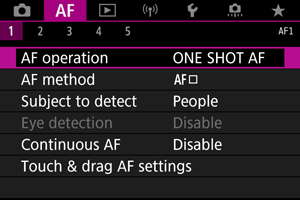
Once you understand all that you can proceed to the next item to be aware of and that is “Subject to detect”. This should be pretty obvious, if you’re photographing people this setting should be on “People”. If you’re photographing animals then it should be on “Animals”. And if you’re photographing vehicles it should be on “Vehicles”.
That all makes sense I am sure, but the thing is having that ability means you can also leave it on the wrong setting very easily. It has happened to me a few times at least. I was working with a wedding couple and I was seeing that the AF box was jumping around and not sticking well to people’s faces… well, I accidentally didn’t have it set to “PEOPLE”. So, while this setting is making obvious sense, it’s important to remember that the camera isn’t going to warn you when it isn’t working exactly right, it’s just going to “sort of” work.
Right below “Subject to detect” is another important setting called “Eye detection”. When it’s enabled the is going to put a little blue box around one of the eye’s of your subject and that eye will be what it tries to keep in focus. With “Eye detection” enabled the camera is going to attempt perfect focus right on the iris of your subject’s eyeball. That may cause the camera to lose focus more easily because choosing the eyeball is a high standard of accuracy.
If you set “Eye detection” to “Disable” the camera will fall back to face detection only and will put the blue focus box around the subjects whole face.
The next settings to be aware of are on Page 3 of the AF menu and these settings are a lot more tricky. These settings only affect “SERVO AF” which is why this menu says “Servo AF” at the top regardless of your AF method.
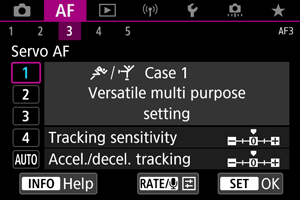
90% of people can simply leave it on Case 1. It is called versatile multi purpose and that is exactly what it is. It is the setting to choose and leave set to the defaults. Don’t ever change the Case 1 page, leave it as it is because it’s just a smart thing to be able to fall back on and know that it’s probably gonna work well enough.
The other cases simply change the “Tracking sensitivity” and the “Accel./decel. tracking”. Basically these 4 settings are 4 different presets that you can leave as is or change however you see fit.
With Accel./decel. tracking the camera is going to change how fast it will rack focus to stay on a subject. Some lenses are going to need to be left at “0” while others will be able to perform amazingly well at +2.
Essentially what Accel./decel. tracking does at +1 and +2 is rack focus faster to stay on the subject when it is moving towards or away from the camera. While this sounds all well and good some lenses will perform worse with this feature at +2. Basically the camera can overrun it’s focus point with a lens such as the RF 28-70mm f/2 L. While this lens has very accurate focus capability its motor is moving a lot of glass when it focuses which means the faster the lens focuses the more momentum the focusing group generates. All that momentum can make it harder for the lens to stop and change direction if the subject changes direction. It’s better for that lens in particular if the focus group doesn’t ever move too fast.
Setting Accel./decel. tracking to -2 will have the opposite effect. Now the camera is going to rack focus more slowly and consistently. It’s not going to react as rapidly to little changes in movement which helps lenses with heavy elements like the RF 28-70mm.
With Accel./decel. set to -2 subjects that move around rapidly in random directions may get lost by the camera’s AF, and with the +2 setting the camera may miss focus with some lenses due to the heavy weight of the lenses focus group.
Unless you’re a professional sports photographer you can just leave Accel./decel. at 0. The camera is still going to rack focus very rapidly.
“Tracking sensitivity” is the other tunable behavior on this page and it controls how “sticky” the subject tracking is. If it is set to -2 the camera will attempt to stay on the subject as best it can and will reacquire the subject even if it is lost or leaves the frame momentarily. Imagine you’re trying to follow someone walking through a crowd, -2 for “Tracking sensitivity” would be your best option there. +2 will cause the camera to always jump to the best available subject. That means that if 3 people are standing in frame and 2 of them turn away from the camera then the tracking box will jump to the person still facing the camera. Now, if that person turns away and another turns towards the camera, the camera will then jump to the new visible face. The same rules apply to changes in framing.
I have learned how the camera works with both settings on 0 and I’m pretty happy with it. It’s sticky enough and reactive enough to stay on a subject such as during a wedding first dance, but it’s not so sticky that I can’t get it to quickly switch from one person to the other when I change my frame or the people change position. Using -2 for “Tracking sensitivity” was generally bad because the camera really wants to get back to the first subject, and if their face pops up in frame it will snap right back onto it. +2 for “Tracking sensitivity” was also bad because if the person turned away for a split second it would jump to someone else or track people in the background.
There is also an “AUTO” at the bottom of the list of cases that lets the camera try to figure out what the best settings are on its own. How it does that or what rules it follows I don’t know.
If you have any questions or ideas about how to set up the R5, feel free to share them in the comments below!