A 360 photosphere is a special type of panorama that spans a full 360 degrees in all directions. Normal panoramas are typically rendered using projections that turn the spherical view of the world into a flat plane, much like how a map of the world is projected onto a flat plane in an old fashioned printed Atlas.
Forcing the spherical image of the lens onto a flat rectangle of the image sensor works well for most types of photography. It is exactly how our own eyes see after all… but it is not what our own eyes see. Therefore, in instances where its desirable to create an effect that better represents not only how the eye sees, but what the eye sees, a photosphere can be used.
A typical use of photo spheres and spherical projections is virtual reality goggles.
Creating photo spheres can be done in one of two ways. The first way is to use a dedicated photo sphere camera. This type of camera is actually multiple cameras in unit which leads them to being a bit expensive. Such devices can have as few as 2 cameras in them, or, sometimes dozens of cameras in them. It all depends on how much resolution is desired in the final image. The second way to create a photosphere is to use a single camera and carefully rotate it through 360 degrees of view. This usually requires using a special panoramic head called a nodal rig.
Below is an example of a spherical image that has been projected into 3D space using Javascript:
Looks pretty cool doesn’t it? Photosphere’s are great but stitching one together isn’t exactly a manual process.
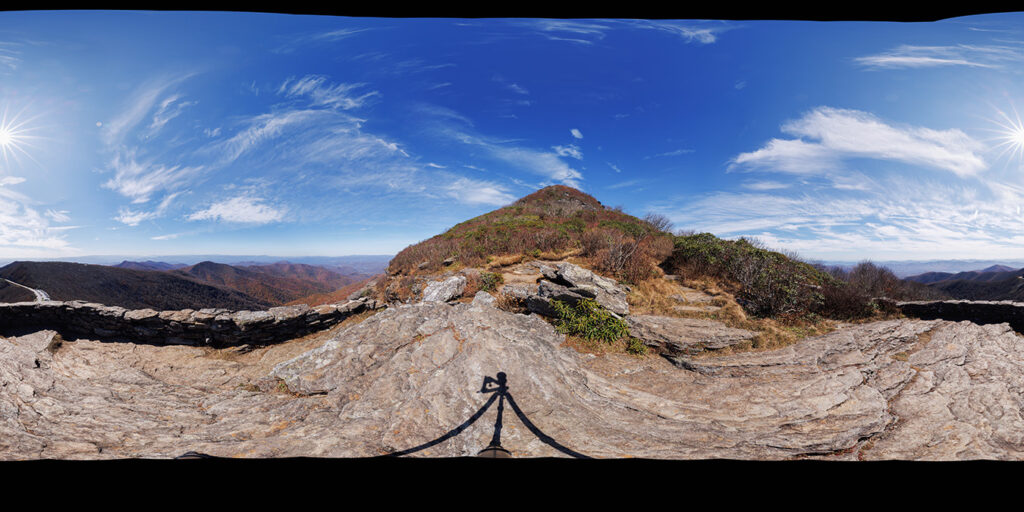
Here is what the 360 photo sphere looks like when the spherical image is unwrapped into a standard image file:

As you can see, the image appears very oddly distorted. The only way to view this correctly outside of a computer or VR system would be to print it on the inside surface of a sphere. If you could then view the inside of the sphere the image would appear “normal” to your eye. Keeping spheres around to hold pictures seems like an odd thing though doesn’t it?
This photosphere was taken with 24 images in 2 rows at 16mm using a camera placed on a tripod with a nodal rig.
Photospheres are fun but not particularly creative ways of taking pictures. They’re not very emotive and they don’t require as much thought or artistic ability. Having said that, I think it is fun to take photospheres once in awhile for my own personal use and to share with friends who might want to see the places I visited.
Making photosphere’s with a mirrorless camera or DSLR is a difficult process that requires a degree of technical knowledge but it is pretty simple to do once you learn how to do it.
The main issue with using a single camera on a tripod to take a photosphere is that a lot of time passes from the beginning to the end of the photosphere creation. This means that things like clouds will most likely move from shot to shot. For this reason it is best to use as wide of a lens as possible, the closer to 180 degrees field of view the better. In fact, the best lens is a fisheye lens as it will capture 180 degrees in a single shot, which means a photosphere can be completed in just two shots with a DSLR. If you only have rectilinear lenses something really wide like 10-12mm is best, but 16-24mm can also be used if time allows. The narrower the field of view, the more images that will be required, not just horizontally, but also in vertical rows. For this reason it’s often not feasible to do photospheres with anything above 24mm, especially when outdoors. A photosphere shot at 24mm will probably require a couple minutes to complete as it needs about 24 images in total.
In order to get a better idea of the number of images you’ll need to shoot, take the vertical field of view of your lens and divide it into 180. If you mount your camera vertically in portrait orientation, then the horizontal will be the vertical for this calculation.
Consider a 24mm lens which has 73.7 degree field of view on full frame. Let’s first round down by a few degrees to get into a safe zone (not every lens is exactly what it says on the label). Assume 70 degrees, then divide this number into 180. You don’t actually have to use a calculator for this, just do a basic calculation as you only need to know the minimum number of shots to span 180 degrees. In this case the number is greater than 2 so the minimum number of photos is 3 to fully cover a 180 degree span with a 24mm vertical field of view.
You now know that 3 rows of image will be required to complete the photosphere. The next step is to find the number of images around in a circle on each row you’ll have to take.
Remember that the 24mm lens is mounted vertically in portrait orientation, so the horizontal field of view is the cameras vertical which works out to 53.1 degrees. Again, round down to get into a safe zone, in this case 50 degrees seems right. Now divide 360 by 50, the result is we need a minimum of 8 shots to cover a full 360 degrees.
8 photos to go a full 360 degrees times 3 rows equals 24 photos at a minimum to create a photosphere with a 24mm lens.
Shooting 24 photos in 3 rows is a time consuming process which will result in anything moving around frame borders being out of alignment from shot to shot. If nothing in your scene is moving then you don’t need to worry about this. This can be particularly annoying with clouds moving across skies, and with anything moving around in the wind such as branches, grass, leaves, etc.
In order to to execute a single shot photosphere a special 360 degree camera is required as mentioned at the beginning of this post. While these cameras are really only good for creating spherical pictures and video, they will allow accurate capture of your scene even when stuff is moving around, including the camera.
Here are a couple more photospheres to mess around with.

