Many people fear night photography. It’s one of the more difficult genre’s to get right even with today’s cameras that make it easier than ever. Plus, every time the camera’s get better the standard goes up. So we’re always left chasing the latest and greatest. However, if you’re like me and you can’t buy every model of every camera on earth then you’ll appreciate this simple factoid: there are ways to get great night photos with most DSLR and pro-level mirrorless cameras, even older models. In this post I’ll detail several professional approaches to night photography that you might not have heard of or thought of before.
The first and most important aspect of night photography is to respect every stop of light that you can get. Basically this means that you shouldn’t get lazy about your settings. If you’re shooting at night at 1/200th of a second you might think; “That’s a pretty slow shutter speed, I’ll just leave it at that.” The truth is you should stay on top of your shutter speed when shooting at night and push it as low as possible. If you need help and you haven’t taken my manual photography crash course yet, check it out here! It’s only $99 and worth every penny.
The same applies to aperture as well. If you’re at f/3.5 on an f/2.8 lens, go ahead and snap that aperture open to it’s widest setting. It might seem negligible to go to f/2.8 from f/3.5, it’s “only” 2/3rd’s of a stop, but every stop matters at night. Remember, 1 stop is double the light.
The end goal of respecting every stop of light you can get is to keep your ISO as low as possible. If you’re shooting at 1/40th of a second or something slow like that, and you go into a brighter area, should you just automatically crank the shutter speed back up? No! Instead of following that gut reflex, bring that ISO down instead, that’s where you’ll claw back precious image quality and bring up your night photography level.
Another obvious hack to improve your night photography is to use a tripod. The tripod will let you drop the shutter speed to levels that would be impossible to reach hand held. Or, if you need a smaller aperture to get better image quality a tripod will let you do that also. A tripod is a photographers best friend when it comes to night photography.
Using a tripod might seem obvious, but did you know about some other ways to make the tripod work for you? One cool technique for night photos is called image stacking. If you aren’t familiar with image stacking check out my article on the subject by clicking here. Image stacking is quite simply a lot easier to get right if a tripod is used.
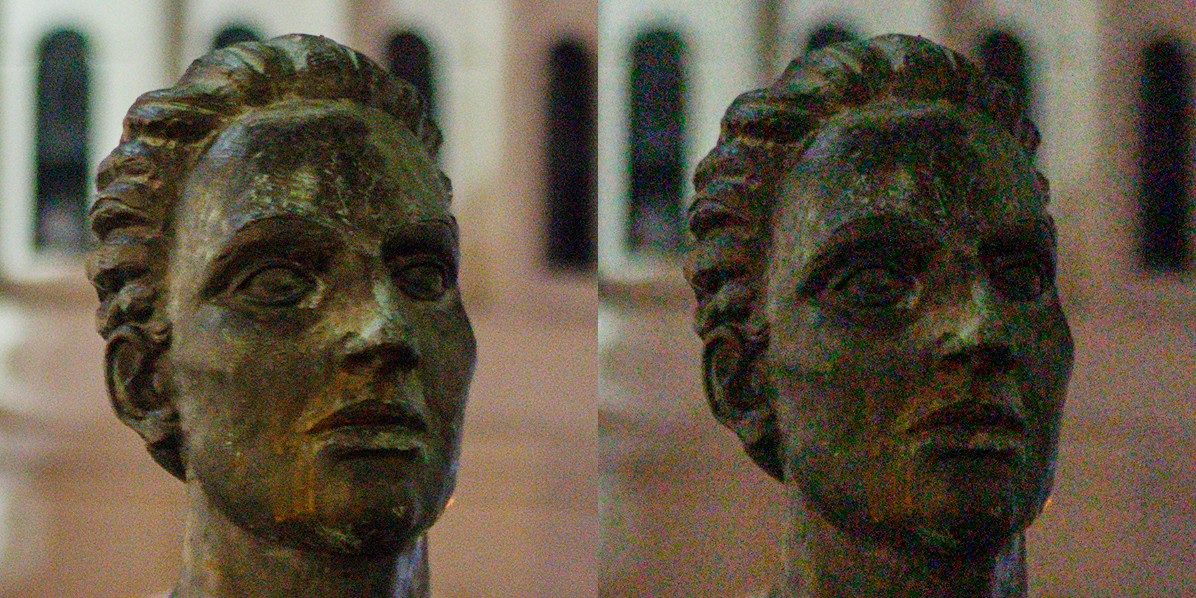
Below you can see that image stacking allows for color accurate and noise free images even at night. It also substantially increases dynamic range.
In the closeup comparison below the image at left is the result of the stacking process. The image below on the right is a closeup of one of the originals that was used in the stacking process. The image on the left is much more clear and has almost no visible noise compared to the image on the right.
Click here to read my article on how to do image stacking.
While image stacking is a powerful method for eliminating noise, it has it’s limits. First and foremost it doesn’t work with moving subjects. Camera movement is also not good. Even the slightest parallax will cause loss of sharpness in the final image.
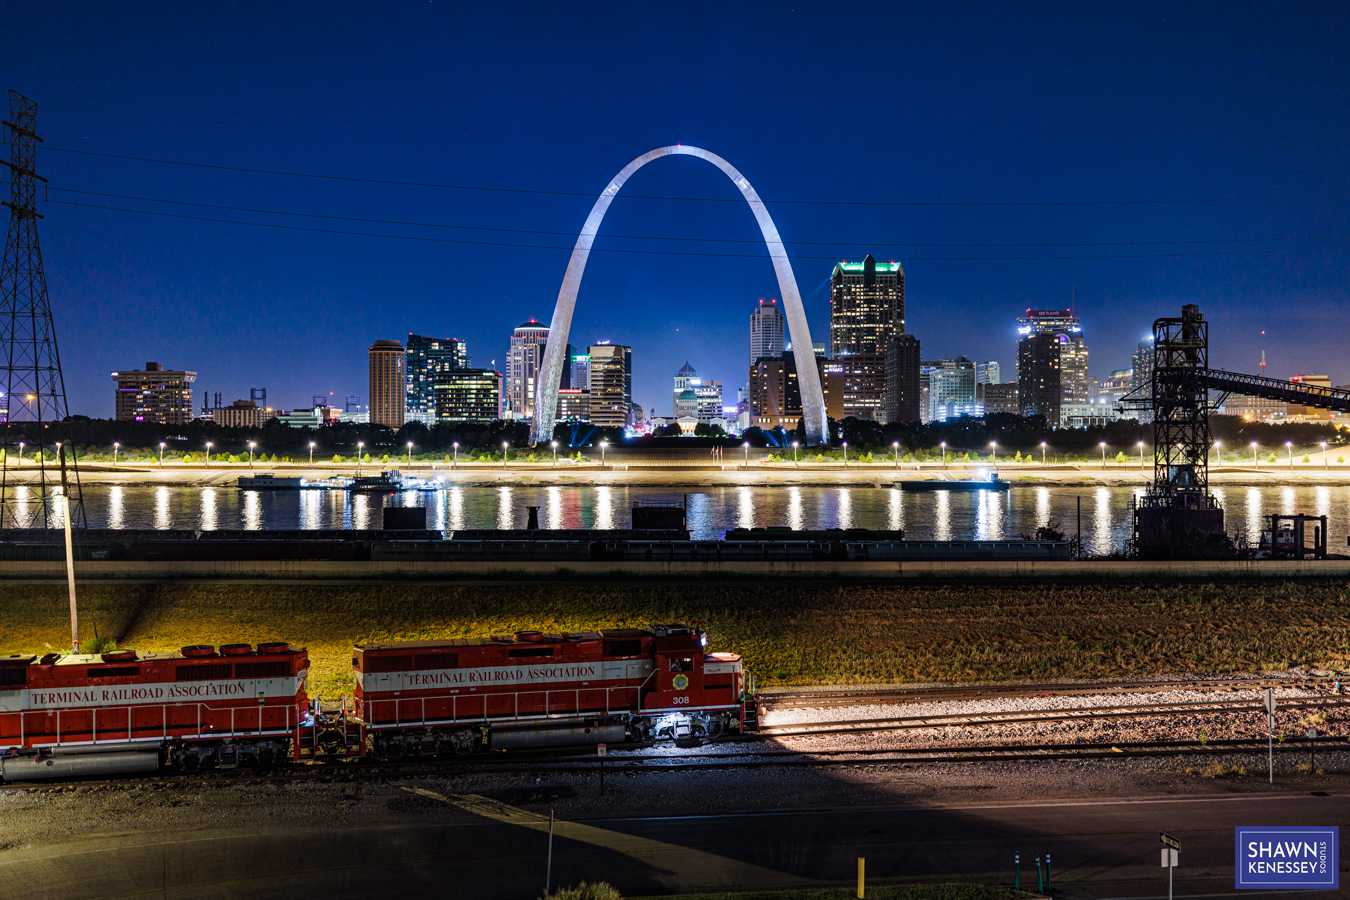
Speaking of which, don’t think that just because you’re subject is moving a tripod won’t help you. A tripod can absolutely help you with photographing moving subjects at night or in low light. The reason this is true is if you’re using a long lens like a 200mm or 300mm focal length the minimum safe shutter speed for hand holding is going to be higher than the minimum for people just kind of milling around. Using a tripod will also be a lot less effort than trying to carefully hand hold such long focal lengths for longer than normal shutter speeds.
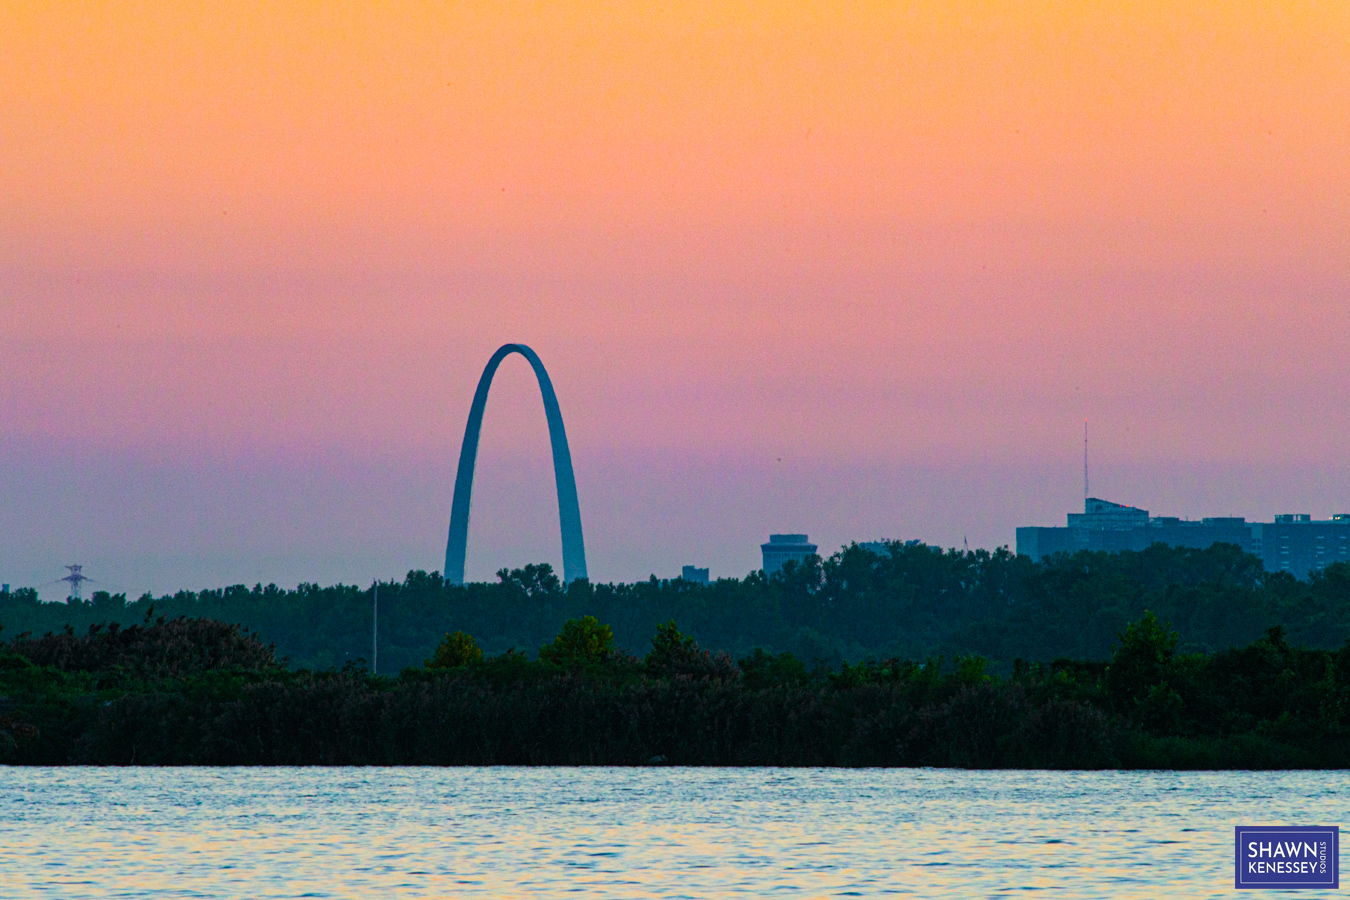
I use a tripod when using a 600mm focal length for bird & wildlife photography. Unfortunately, I don’t own a 600mm prime (wish I did) so in order to get to 600mm I have to put a 2x extender on a vintage 300mm f/2.8 manual focus lens. While this lens can still deliver a surprisingly good picture, it’s nowhere near as sharp as a modern lens, especially wide open. The 2x tele converter automatically causes a 2 stop loss, forcing f/5.6, but I usually would want to be at f/7.1 at a minimum for sharp pictures. That small aperture cuts the light substantially and makes shooting on a tripod an absolute necessity around dusk. If shooting handheld with that lens 1/600th (1/1000th to fully eliminate camera shake) would be the absolute minimum shutter speed. But if I use a tripod I can drop the shutter to 1/200th or lower as long as the scene is relatively still.
The below image was taken on a tripod at 600mm across a lake with only a 1/40th of a second exposure.
Be careful with lens filters. With all the bright point light sources in a city at night it can wreck havoc on some lenses by producing lens flares and haze in your images. This is especially true for vintage lenses or lenses that have cheap filters on them. While those cheap UV filters will work fine during the day, the high contrast night scenes may cause them to sully your images with lots of weird flares and reflections that show up in your pictures as hazy bright areas or streaks and circles of light. The best option is to simply not use any filters on your lens when doing night photography.
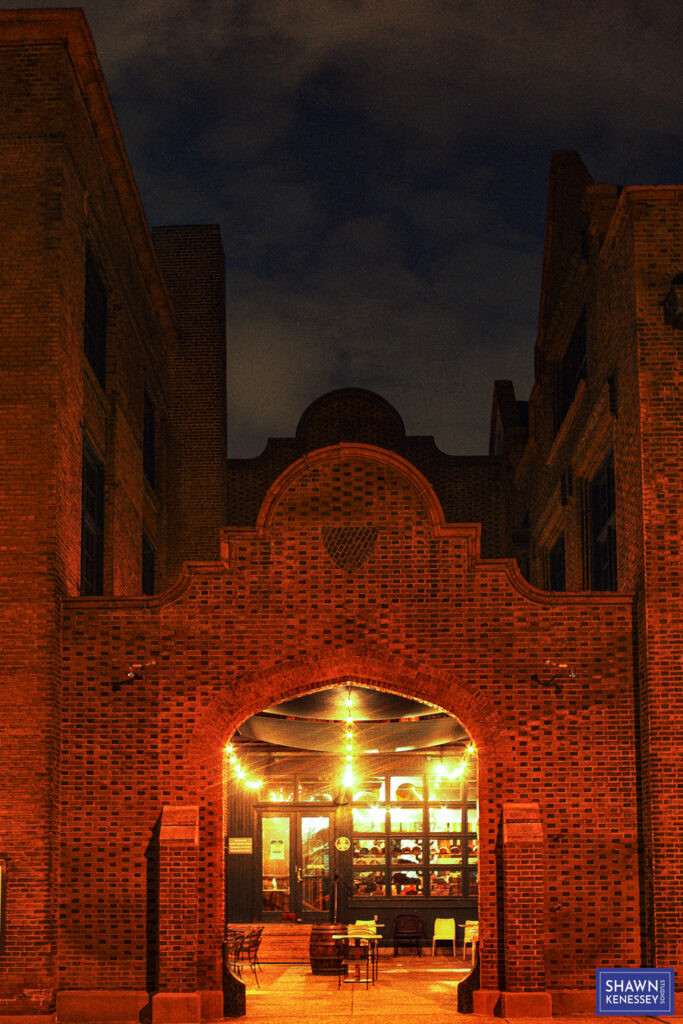
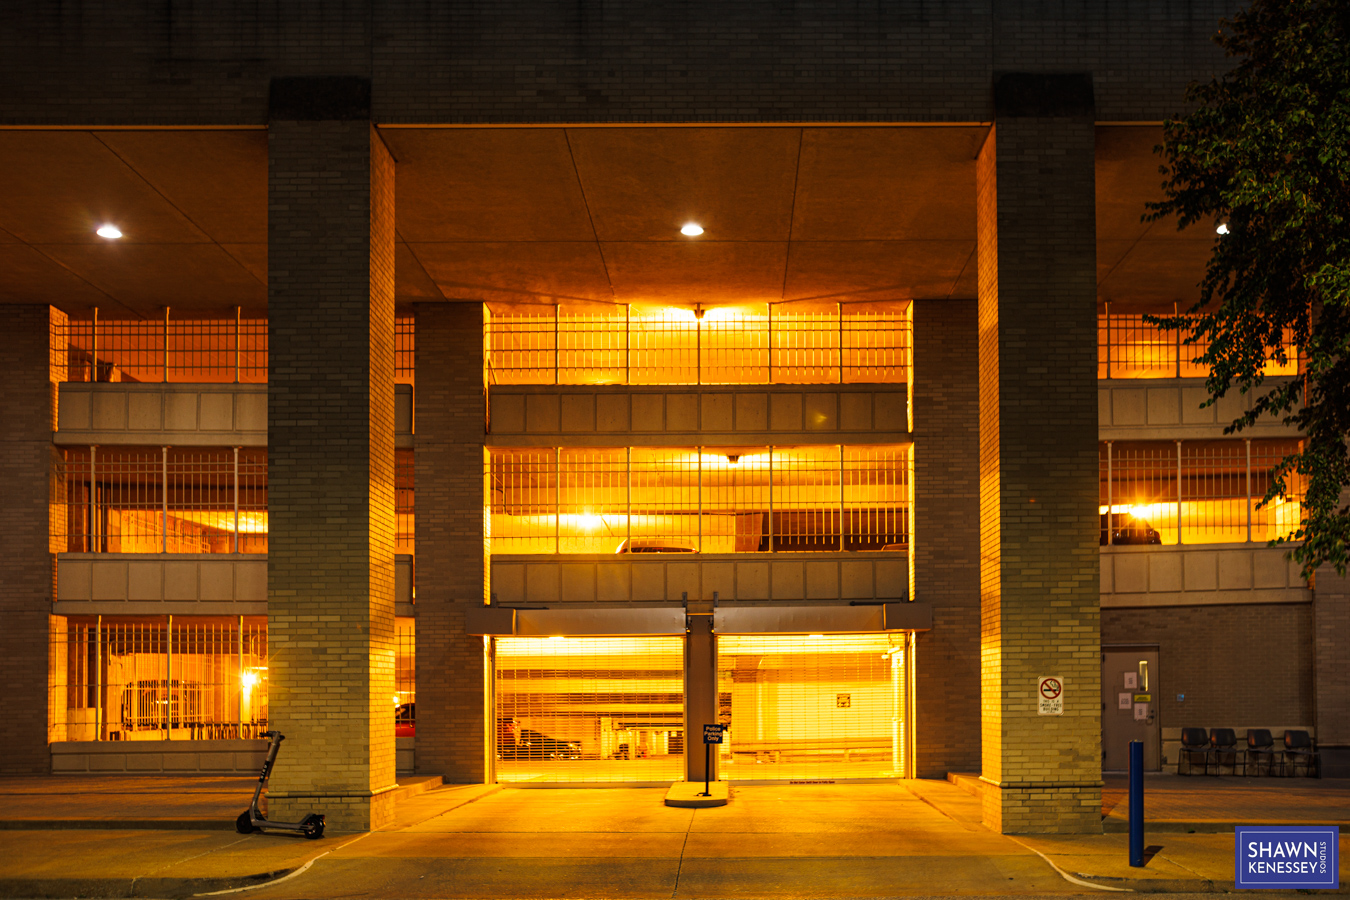
If you have to hand-hold your camera at night make sure you have good technique. When doing longer exposures you want to keep the camera as still as possible while taking the picture. First, get into a stable stance with equal weight on both feet. Also, keep the camera in tight to your body, either by using the EVF/VF and holding the camera up to your eye, or by using the rear screen tilted up. The best technique for shooting hand held long exposures is by using the rear screen. You’ll hold the camera with both hands while keeping your elbows pinned to your sides. Maintain a wide stable stance and keep the rear screen tilted up so you can see it easily. Then, take a deep breathe, hold it, concentrate, and release the shutter. Eventually you’ll be taking tons of awesome night photos.
The photo below was taken with this method using a shutter speed of only 1/3rd of a second (.3 sec).
Be careful with IBIS when using ultra-wide-angle lenses. While using stabilization may seem like a no-brainer, you’ll want to triple check that your IBIS system isn’t making your image worse when using an ultra-wide-angle lens. I’ve found that many times I can already get the shutter speed so low when using an ultra-wide that I don’t even need the stabilization to shoot at 1/15th of a second. With an f/2.8 aperture 1/15th of second should be plenty bright for most hand held night photography scenarios. Remember that the one over your focal length rule does work for wide angle lenses. So 1/15th of a second should be hand-holdable with a 16mm focal length and no stabilization.
Another important technique is to avoid underexposing your images, even with low ISO settings. Nighttime light, while high contrast due to the fact that it’s dark, has substantially slower roll off of the highlights when compared to the daytime sun. This means that it’s usually ok to push the exposure higher than normal. You can then pull back the exposure when editing to end up with a higher quality final image. To learn more about why this works check out my post on how to set your ISO properly.